Posted by Fred Koenig on Dec 15th 2020
Widefield Fluorescence Microscopy and Fluorophores Explained
What is Widefield Fluorescence Microscopy?
In widefield fluorescence microscopy, the entire sample is illuminated with a specific wavelength of light. The fluorescent molecules are excited and emit their own light, which is observable through eyepieces or through use of a camera.
Identification and visualization of cells can occur using this technique, as can 2D images across the whole of the field of view. In this manner, even live processes can be observed in real time, such as neuron signaling.
Learn more about general fluorescence microscopy here .
Fluorophores Explained
Each type of fluorophore molecule is excited by a specific wavelength of light, making it possible to isolate certain structures using different dyes. Light is absorbed by the fluorophore molecule, and they enter an excited state. When they return to their ground state, they then give off a longer wavelength of light (called the “emission wavelength”). This is seen as fluorescence.
It is sometimes useful to know the difference between the excited and ground wavelengths, a measurement called the “Strokes shift.” Each fluorophore has a range of wavelengths that it can absorb and emit. This is called the “emission spectrum” of the particular fluorophore. As this is a range, each fluorophore has a peak wavelength of excitation as well as a peak wavelength of emission. The difference between the two spectra allow the differentiation between separate target structures in the same sample.
Fluorophores can even be used to identify specific parts or structures in biological samples. Some biological structures already have their own fluorophores naturally occurring within them – chlorophyl is a common example. DNA can be altered to create fluorescence in otherwise non-fluorescent biological tissues as well, even living ones. Antibodies can be tagged with small molecule fluorophores and then introduced to the sample – Texas Red is often used in this way.
Researchers have developed fluorophores that are able to emit colors across the visible light spectrum. Green Fluorescent Protein (green), the aforementioned Texas Red (red), and 4’,6-diamidino-2-phenylindole – DAPI (blue) are common examples.
How Does a Fluorescence Microscope Work?
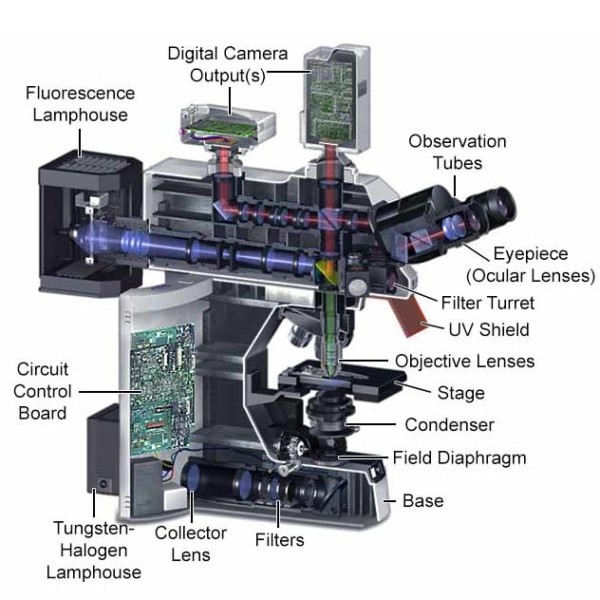
In a fluorescence microscope, light is shone through an excitation filter that allows only specific wavelengths through.
Specific filter settings are chosen to allow through the particular wavelength to excite a particular fluorophore, which is excited and emits its own light.
This light reflects from a dichroic mirror, is focused by the objective lens, and then hits the sample. When the excitation light hits the sample, the fluorophores within the sample are excited and then return to their ground state, at which point they emit their own light, of a longer wavelength.
The objective collects some of this light, which is transmitted by the dichroic mirror through an emission filter, and what is not filtered out continues to the eyepiece or camera for viewing.
Because both the excitation and emitted light pass through the same objective lens, this technique is called epifluorescence. “Epi,” from the Greek, means “same.”
A structure called the “filter cube” usually holds the excitation filters and dichroic mirror. This filter cube reduces interfering light, known as “noise,” from muddying up the image or overwhelming the desired emitted light with ambient light.
You can buy a new fluorescence microscope here .
Using a Camera in Fluorescence Microscopes
Most of us used microscopes with eyepieces, while in school, but if one wishes to capture an image for later analysis, a camera is necessary. Cameras for use with microscopes contain millions of diodes, each of them with a semiconductor sensor that converts any light striking it into electrical current. Charge Coupled Devices (CCDs) and Complementary Metal Oxide Semiconductors (CMOS) comprise the most common semiconductors. The best choice of camera depends on the situation – for example, the required frame-rate, the noise level, and the sensitivity.
Scientific CMOS, known as sCMOS cameras offer low noise and rapid frame rates, yet their dynamic range and resolution are high, and they can offer this over a wide field of view. These cameras work well for high fidelity, quantitative research in situations of low-level light.
Another camera that enables fast detection of low-light fluorescence is the Electron Multiplied CCD camera. Fluorescence signals can be gradually accumulated, with high resolution and little noise, using a cooled CCD camera.
Light Sources in Fluorescence Microscopes
Modern light sources are usually light-emitting diodes, commonly known as LEDs. They have the ability to closely control their wavelengths and intensities, they are economical, cooler-running, do not require alignment, and they are compact and light of structure. All in all, they are very well suited to the purpose – much better than the arc-lamps and tungsten-halogen lamps that used to be the only real choices.
Mercury or xenon arc-lamps allow close control of wavelengths, but their intensities are high and they produce a lot of heat, which can photobleach or phototoxize the samples. They are also difficult to dispose of in an environmentally responsible manner, and don’t last as long as the LEDS.
The tungsten-halogen lamps do not run as high a risk of phototoxicity, and are less expensive than mercury or xenon versions, but their intensity is lower and cannot excite weak fluorophores sufficiently for good observation.
You can buy LED fluorescence microscopes here .
Limitations of Image Resolution
The high-resolution images produced by widefield microscopy can have some limitations.
The entirety of the sample is illuminated, which can make it difficult to tell the depth from which fluorescence originated – and the problem is more pronounced the thicker the sample is.
For observation of live cells and tissues, with emission light incorporated throughout the sample, scattered fluorescence can blur the image and make 3D imaging ineffective.
In such cases, fluorescence deconvolution microscopy and structured illumination microscopy can solve the problem.
Best Configuration
Illumination of the sample can come from above, with an upright microscope or from below, with an inverted configuration. The latter type is best for observation of living cells in culture, but when observing fixed samples, such as tissue slices, uprights are best.
If you want to learn more about fluorescence microscopy, have a look at the following articles: