Posted by Fred Koenig on Nov 19th 2020
How to Use a Microscope (Properly) - Step by Step
Before You Start
Familiarizing Yourself
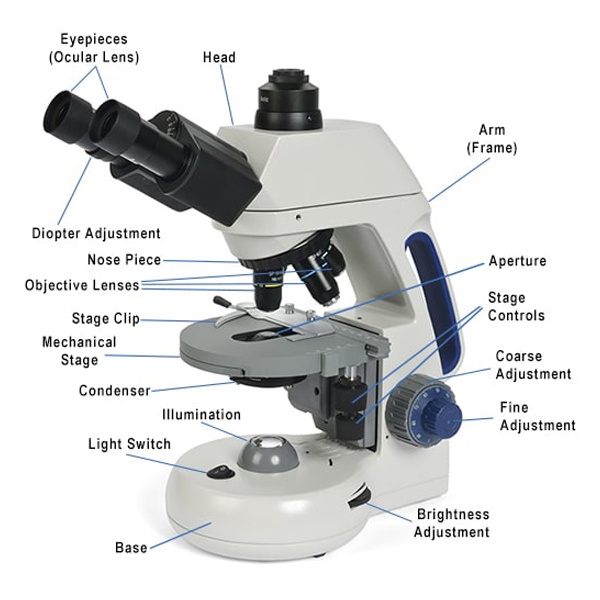
The first step is to go over all parts of the microscope and get a good idea of where everything is and what everything does – especially any dials or other interactive features. This is best done while standing in front of the microscope where you would normally use it, but you should also do a “walk around” to view any features that are hidden from view when using the device.
Preparing Slides
Microscope slides should be prepared beforehand and should include a cover slip (plastic or glass, depending on your purpose and budget). If the objective lens should touch the slide (which should not happen anyway of the device is used correctly, see below), these covers will prevent or minimize damage caused. The “stage clips” should be used to secure the slide (and cover) to the stage. Pushing down in the back end of these stage clips will open them.
Step by Step – How to Use a Compound Microscope
- Turn the Objective Lenses so that the longest lens (the lowest power one) is in viewing position. Be sure that there is room for it to move into place. Lower the Mechanical stage to make more room if needed.
- Place the slide on the Mechanical stage and fasten it with the stage clips.
- Look at the side of the microscope and turn the Adjustment knob until the lens is very close to, but not touching, the slide.
- Look through the eyepiece and move the Adjustment knob so that the lens lifts away from the slide. The image should come into focus. Be careful not to drop the lens into the face of the slide, as this may cause damage to the lens.
- The condenser can be adjusted to increase or decrease light intensity. You will usually want the most light possible for clearer viewing, but with low power objective lenses you may need to decrease the light.
- The slide can be moved around to center the desired image in the field of view.
- Once you have a clear image with the low-power objective, you may want to switch to a higher power one by switching the objective lens. Because they are shorter, you don’t need to worry about turning them into the face of the slide and causing damage. This is one of the reasons we start with the lower ones.
- You may need to slightly adjust the focus and centering of the object you are viewing. If you try this, and it doesn’t seem to come into focus, then drop the lens to very near, but not touching, the slide (look from beside the microscope to do this, not through the eye piece) and then look through the eyepiece while you slowly raise the lens away from the slide. At some point, it will come into focus for you.
- When you have finished viewing the slide, lower the Mechanical stage using the Adjustment knob, click the low power lens into viewing position (in preparation for next time), and remove the slide (by pressing on the ends of the clips to release it).
Extra Tips and Tricks
- Here are some more useful tips to consider before using a microscope:
- When using a microscope with a single eyepiece, it is good practice to keep the other eye open to avoid eye strain. Remember that the image is flipped upside down and horizontally when viewed through the microscope, so when moving it, it will appear to go the opposite way to what you might intend – moving the slide up makes the image move down, and moving the slide to the right makes the image move left, etc.
- Prepare your slide with a protective coverslip.
- Do not touch the middle glass part of the lenses with your fingers, just the edges. There is special lens paper for cleaning the lenses. You may want to use gloves.
- Switch off the microscope when it is not in use.
- Always cover your microscope when not in use.
- Always use both hands when you carry a microscope, with one hand on the arm and the other under the base.
Learn more about microscopes with our other useful guides below: